


Most Popular Software Questions
A video funnel is the backbone of Vidimy. Here's a quick guide to show you how simple it is to set up your video funnels with Vidimy.
Before you start:
Upload the videos for your video funnel into a folder inside your Vidimy video drive.
How to setup video funnel:
1. Go to "Interactive Video" in the top main menu inside the Vidimy dashboard
2. Click "Video drive" to add your videos (or upload new videos) to your video funnel
3a. Setup interactive buttons to lead to other videos by clicking the videos name.
3b. Lastly, click the plus (+) to attach the videos to setup your videos as next funnel step
👉 Pro tip: Start simple. Ask a segmentation question like “Are you a business or an individual?” and guide each answer to a tailored message. That one step can double your conversions.
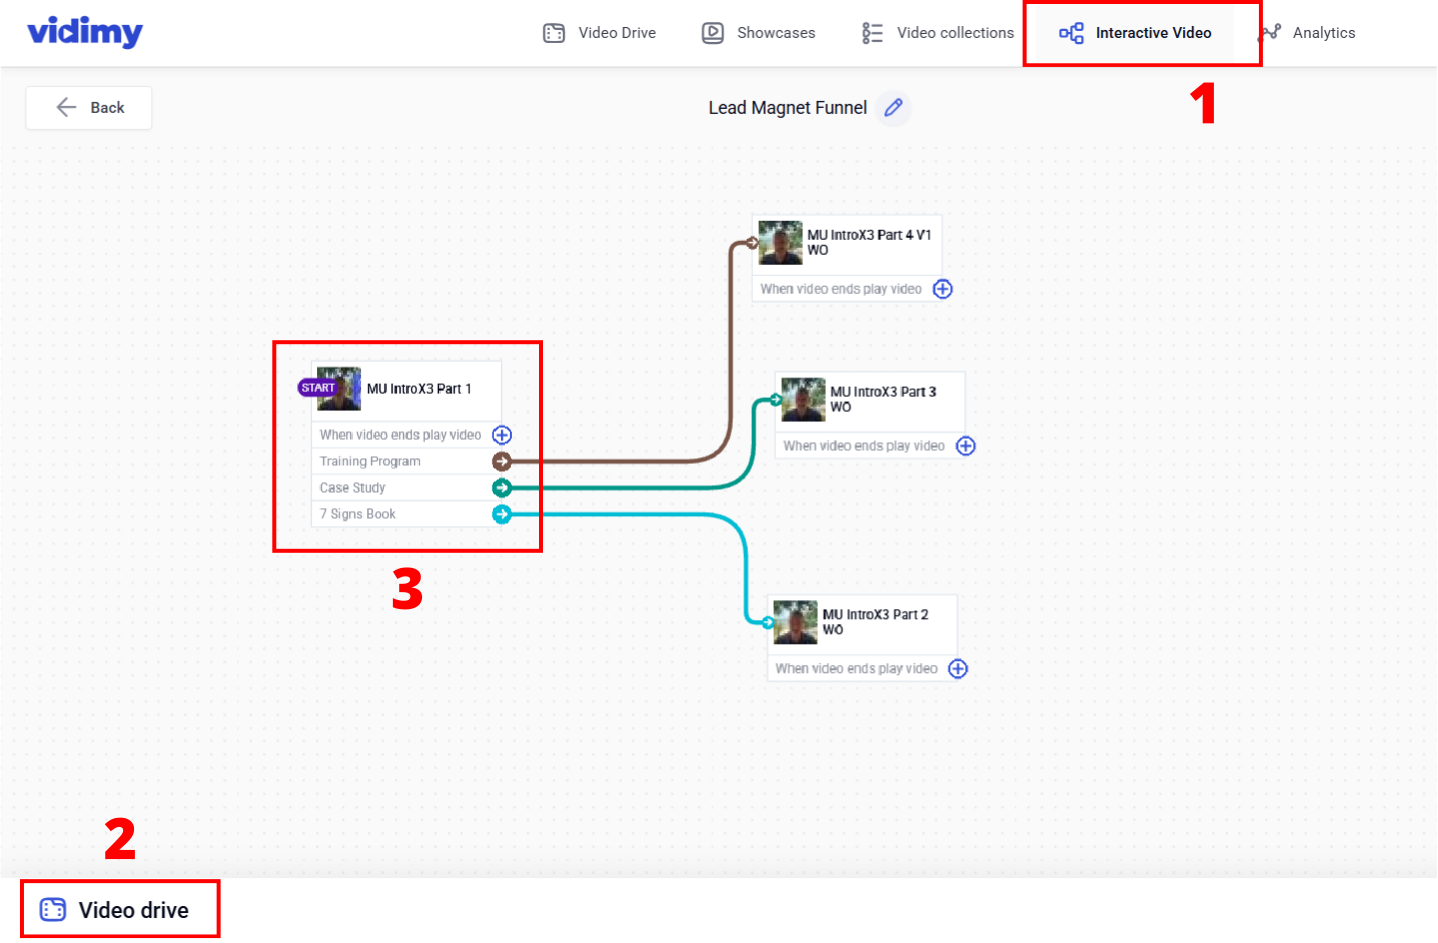
Segmentation is easy in Vidimy:
- Add a clickable choice at the right moment.
- Label the choices clearly (e.g., “I’m a coach” vs. “I sell products”).
- Connect each choice to a different outcome (like different offers or funnels).
This lets you show the right message to the right person — simply create a specific video to each avatar and let them choose their journey!
Important: You can see how to setup your video funnel in the guide to answer the above question. This happens in step 3a.
This guide follows up to the guide above and assumes you've gotten to the "interactive video" andd added the videos into your video funnel.
How To Set Up Interactive Video:
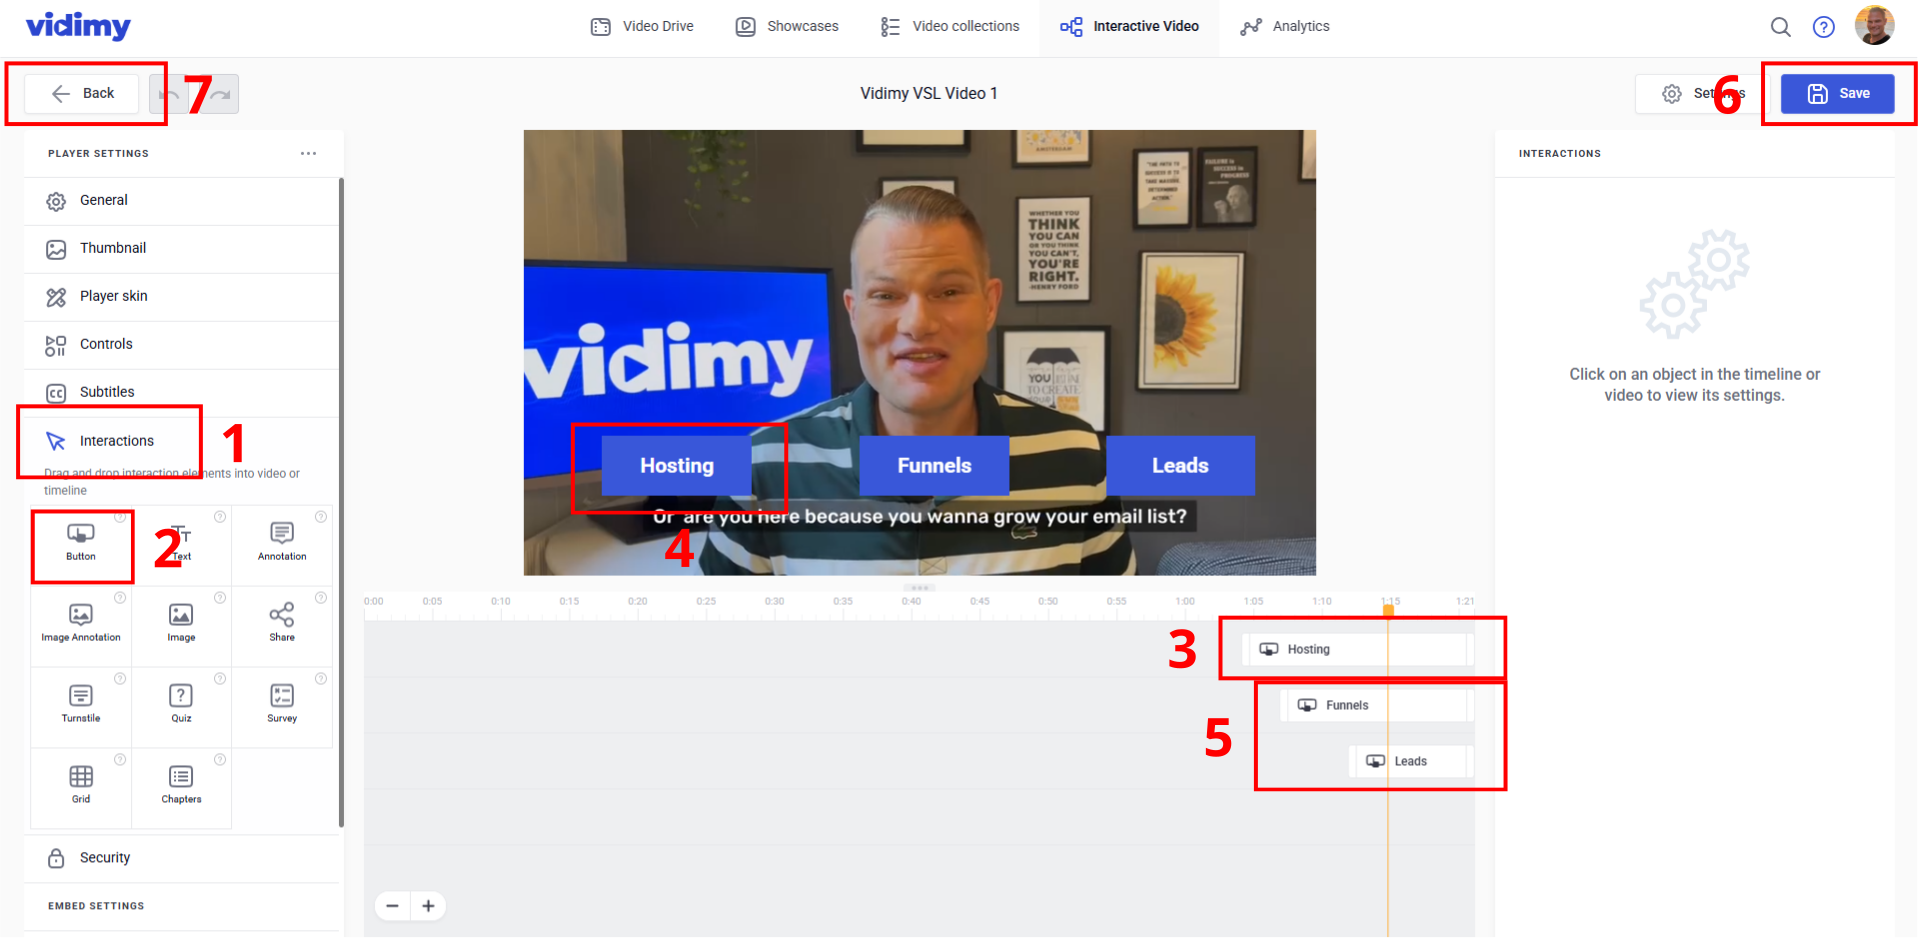
1. Click "Interactions" in the left side menu.
2. Drag the "Button" module out into the timeline below the video and adjust it to pit the time.
3. Click on the button on the timeline to fill out the buttons settings.
4. Customize the buttons to fit your brand and adjust the size by dragging the corners.
5. Add as many interactive elements as needed throughout your videos.
6. Click "Save" to save your video in the top right corner
7. Click "<- Back" in the top left corner to get back to the video funnel editor.
8. Connect your video funnel with your next-step video custom to your audiences choices. (See guide above section 3b)
For VSLs, less distraction = more sales. Inside player settings, you can:
- Turn off the progress bar (so viewers don’t skip ahead).
- Hide controls and branding.
- Setup video thumbnail that makes it feel like the video is playing on page load (for faster engagement).
- And control any other part of the viewers experience!
Think of it like creating a “movie theater effect” — full focus on your message.
Start:
How To Optimize Player Control For VSLs
Pick any video that you have uploaded to your Vidimy Drive, and then
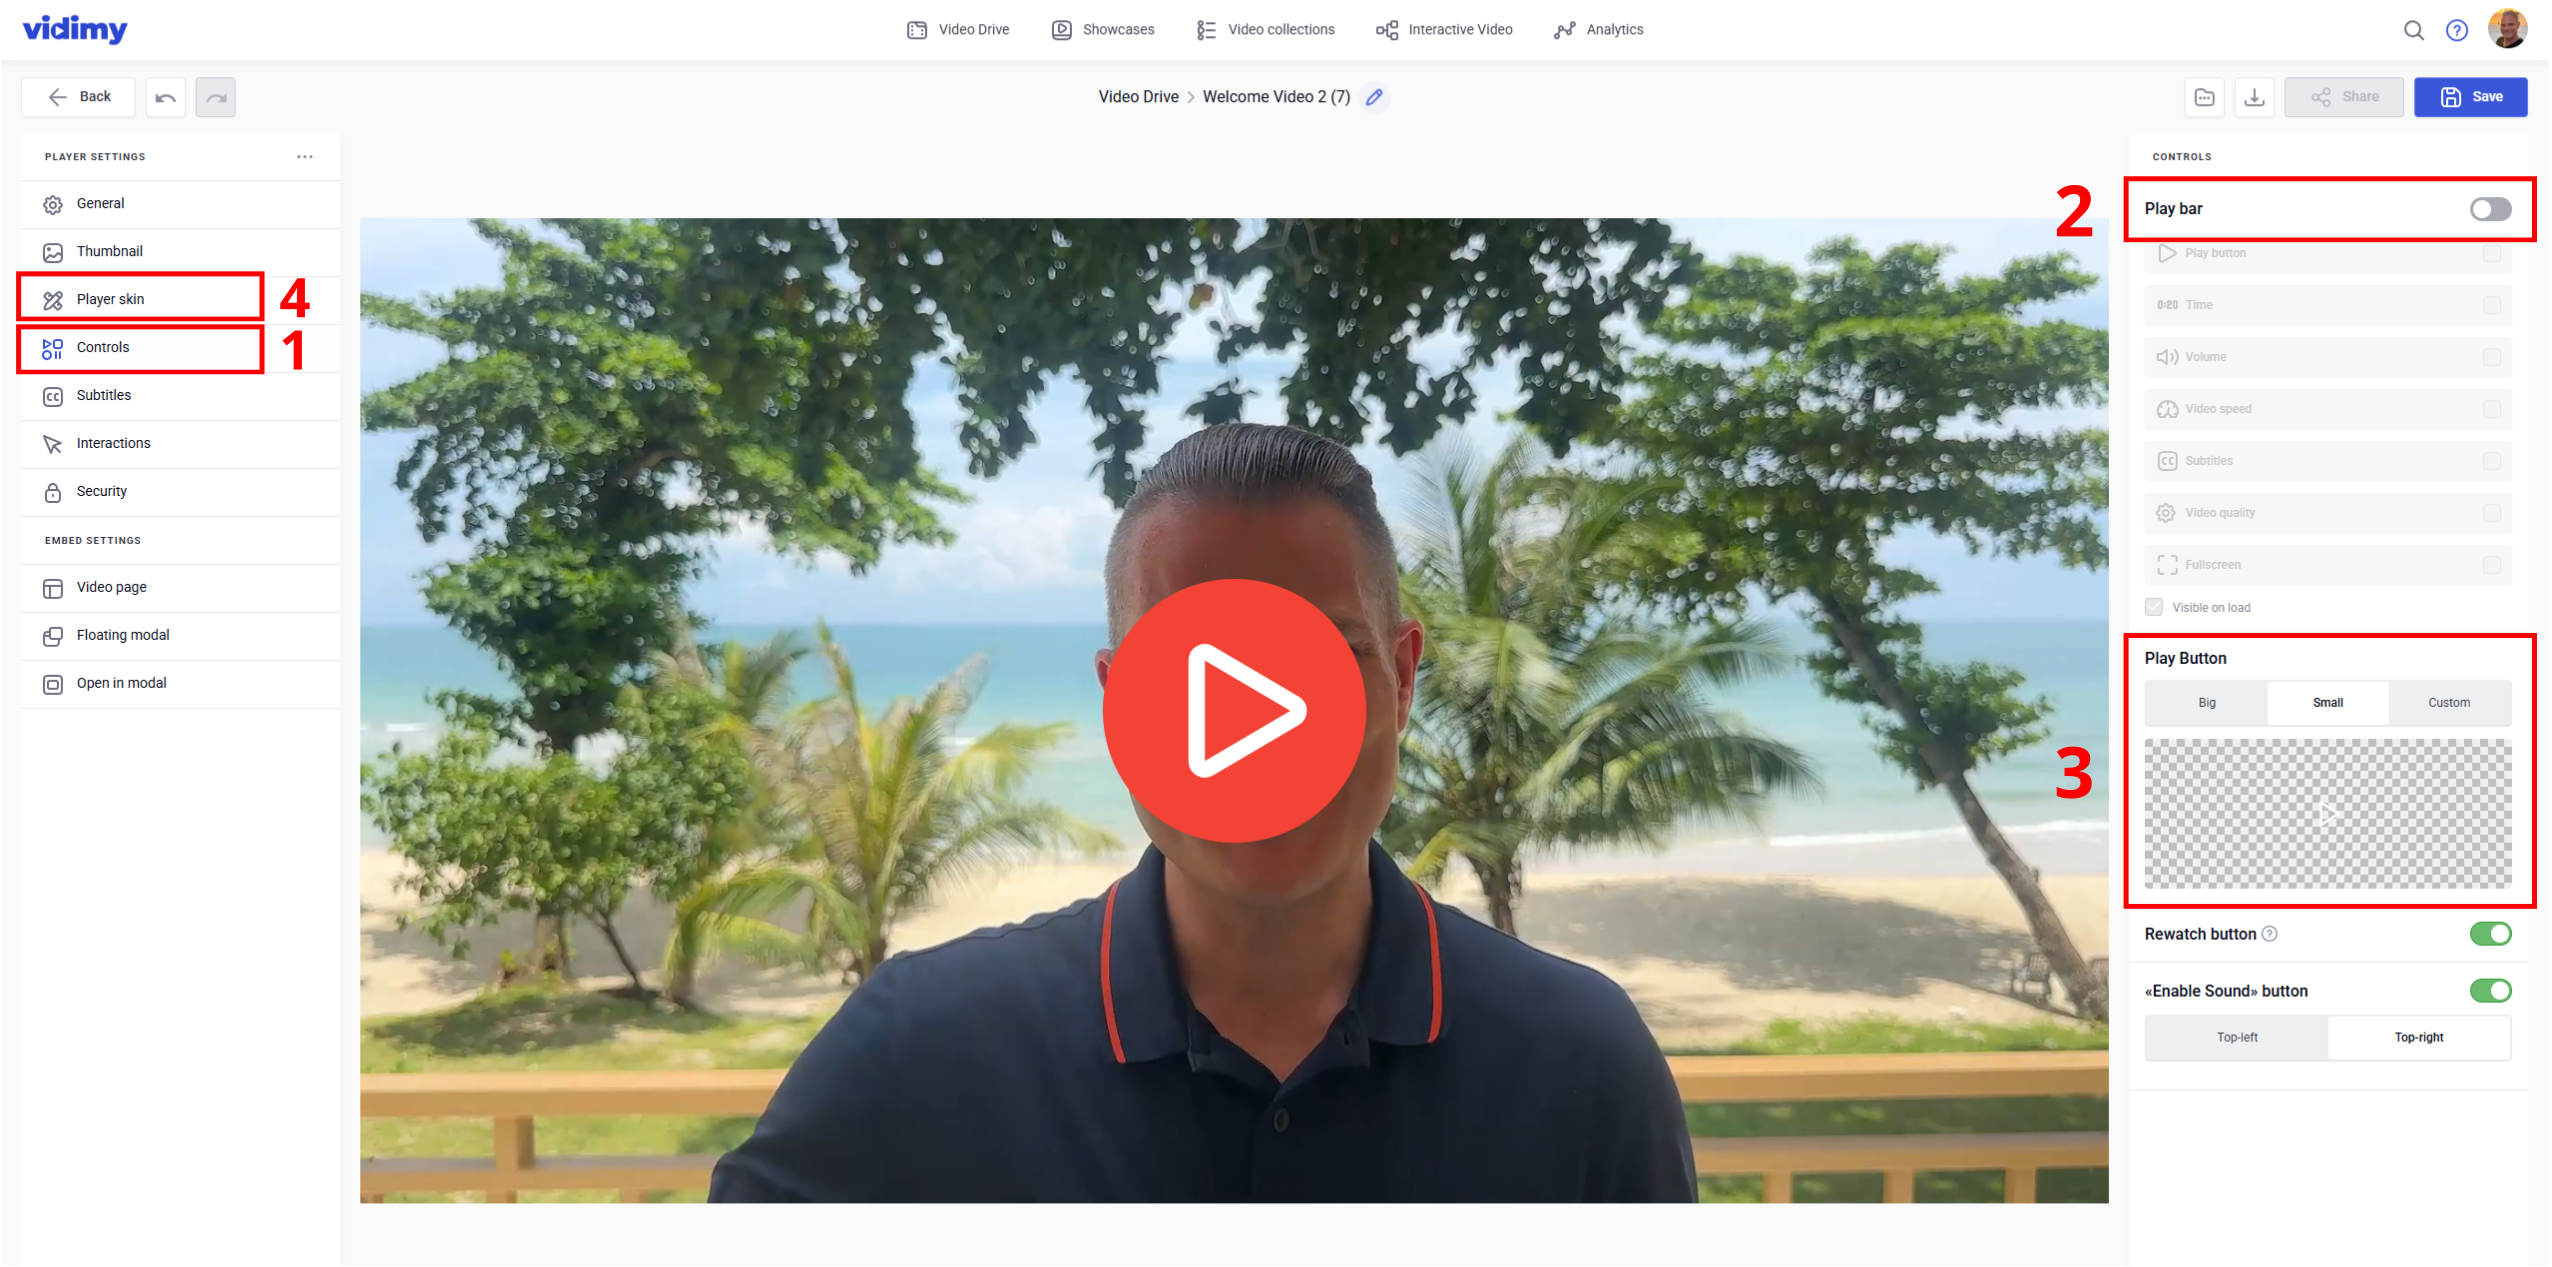
1. Go to "Controls"
2. Deactivate "Play bar"
3. Customize "Play Button" size (or add custom play button)
4. Optional: Go to "Player Skin" to change the skin for different play button style (see below)
(Already Vidimy user? Access the Video Conversion Checklist in the customer center here.)
Social proof sells. With Vidimy you can:
1. Upload all your testimonial videos without any worries.
2. Add clickable hotspots like “See More Reviews” or “Claim This Offer.”
3. Even chain multiple testimonials together into a “Review Funnel” that guides viewers from story → trust → action.
You can also get your viewers to watch reviews that best fit them and their customer avatar where they simply pick the ones they want. It's social proof with superpowers!
It's simple to set up with video funnels where you add different testimonials in the second part of the funnel. You can set it up in just 3 steps.
How to setup video funnel:
1. Go to "Interactive Video" in the top main menu inside the Vidimy dashboard
2. Click "Video drive" to add your videos (or upload new videos) to your video funnel
3a. Setup interactive buttons to lead to other testimonial videos by clicking the videos name.
3b. Lastly, click the plus (+) to attach the videos to setup your videos as next funnel step
Product videos work best when they’re interactive:
1. Add a clickable tag over the product itself (like “Buy Now” or “See Features”).
2. Use chapter points for different angles or features.
3. End with a direct CTA button linked to your checkout page.
This way, you don’t just show your product… you turn the video into a shoppable experience.
How To Showcase Your Products With Interactive Video:
1. Click "Interactions" in the left side menu.
2. Drag the "Button" module out into the timeline below the video and adjust it to pit the time.
3. Click on the button on the timeline to fill out the buttons settings.
4. Customize the buttons to fit your brand and adjust the size by dragging the corners.
5. Add as many interactive elements as needed throughout your videos.
6. Click "Save" to save your video in the top right corner
7. Click "<- Back" in the top left corner to get back to the video funnel editor.
8. Connect your video funnel with your next-step video custom to your audiences choices. (See guide in Q1 section 3b above)
Important: You can see how to setup your video funnel in the guide to answer the above question. This happens in step 3a. This guide follows up to the guide above and assumes you've gotten to the "interactive video" and added the videos into your video funnel.
Yes! Many users go beyond sales:
- Quizzes/Assessments → use interactive questions to qualify leads.
- Onboarding videos → guide new customers step by step.
- Training courses → keep students engaged with clickable paths.
- Testimonials → showcase customer stories with timed CTAs.
- Any kind of interactive experience with videos...
If you’ve got a message that requires action, Vidimy makes it happen.
Vidimy comes with built-in analytics so you can track:
1. Views and drop-off points
2. Click-through rates on actions
3. Conversions from forms inside your video
Look for “hotspots” where people engage most. That’s where to double down.
How To See Video Analytics:
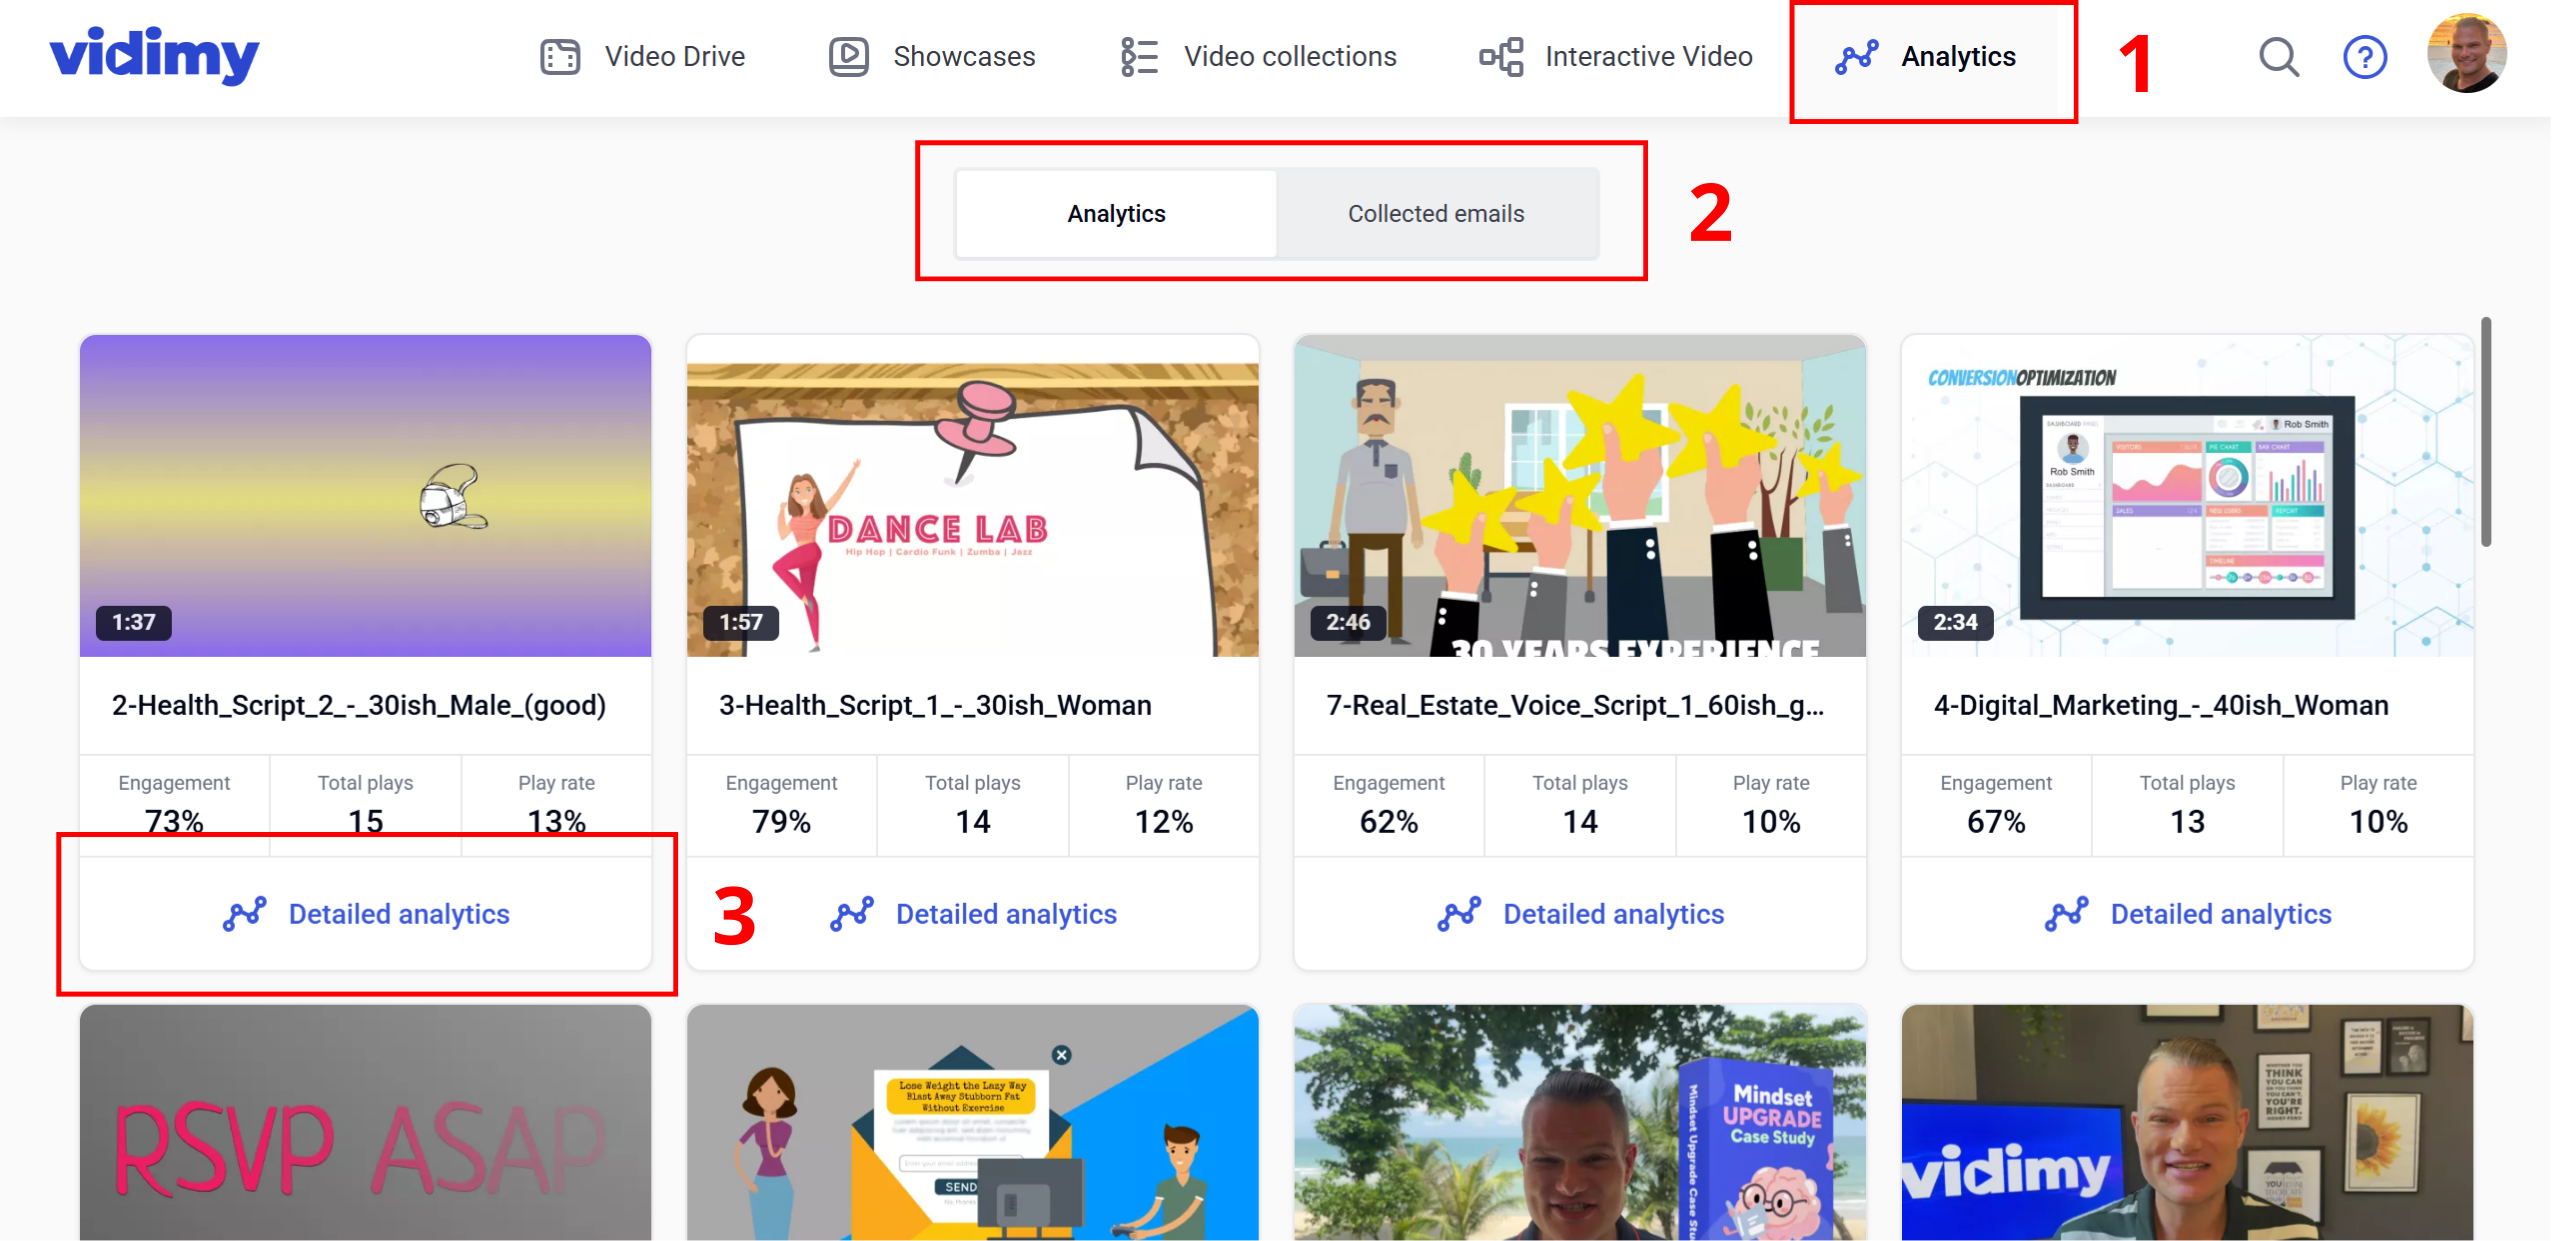
1. Go to "Analytics" in the top main menu in the Vidimy dashboard.
2. Pick weather you want to see "Analytics" (default) or "Collected emails".
3. Pick the video by clicking "Detailed analytics" to see the analytics.
You can easily to any video and video funnel in seconds. It instantly turns any video into vehicle to convert your viewers in a simpler way for them and you...
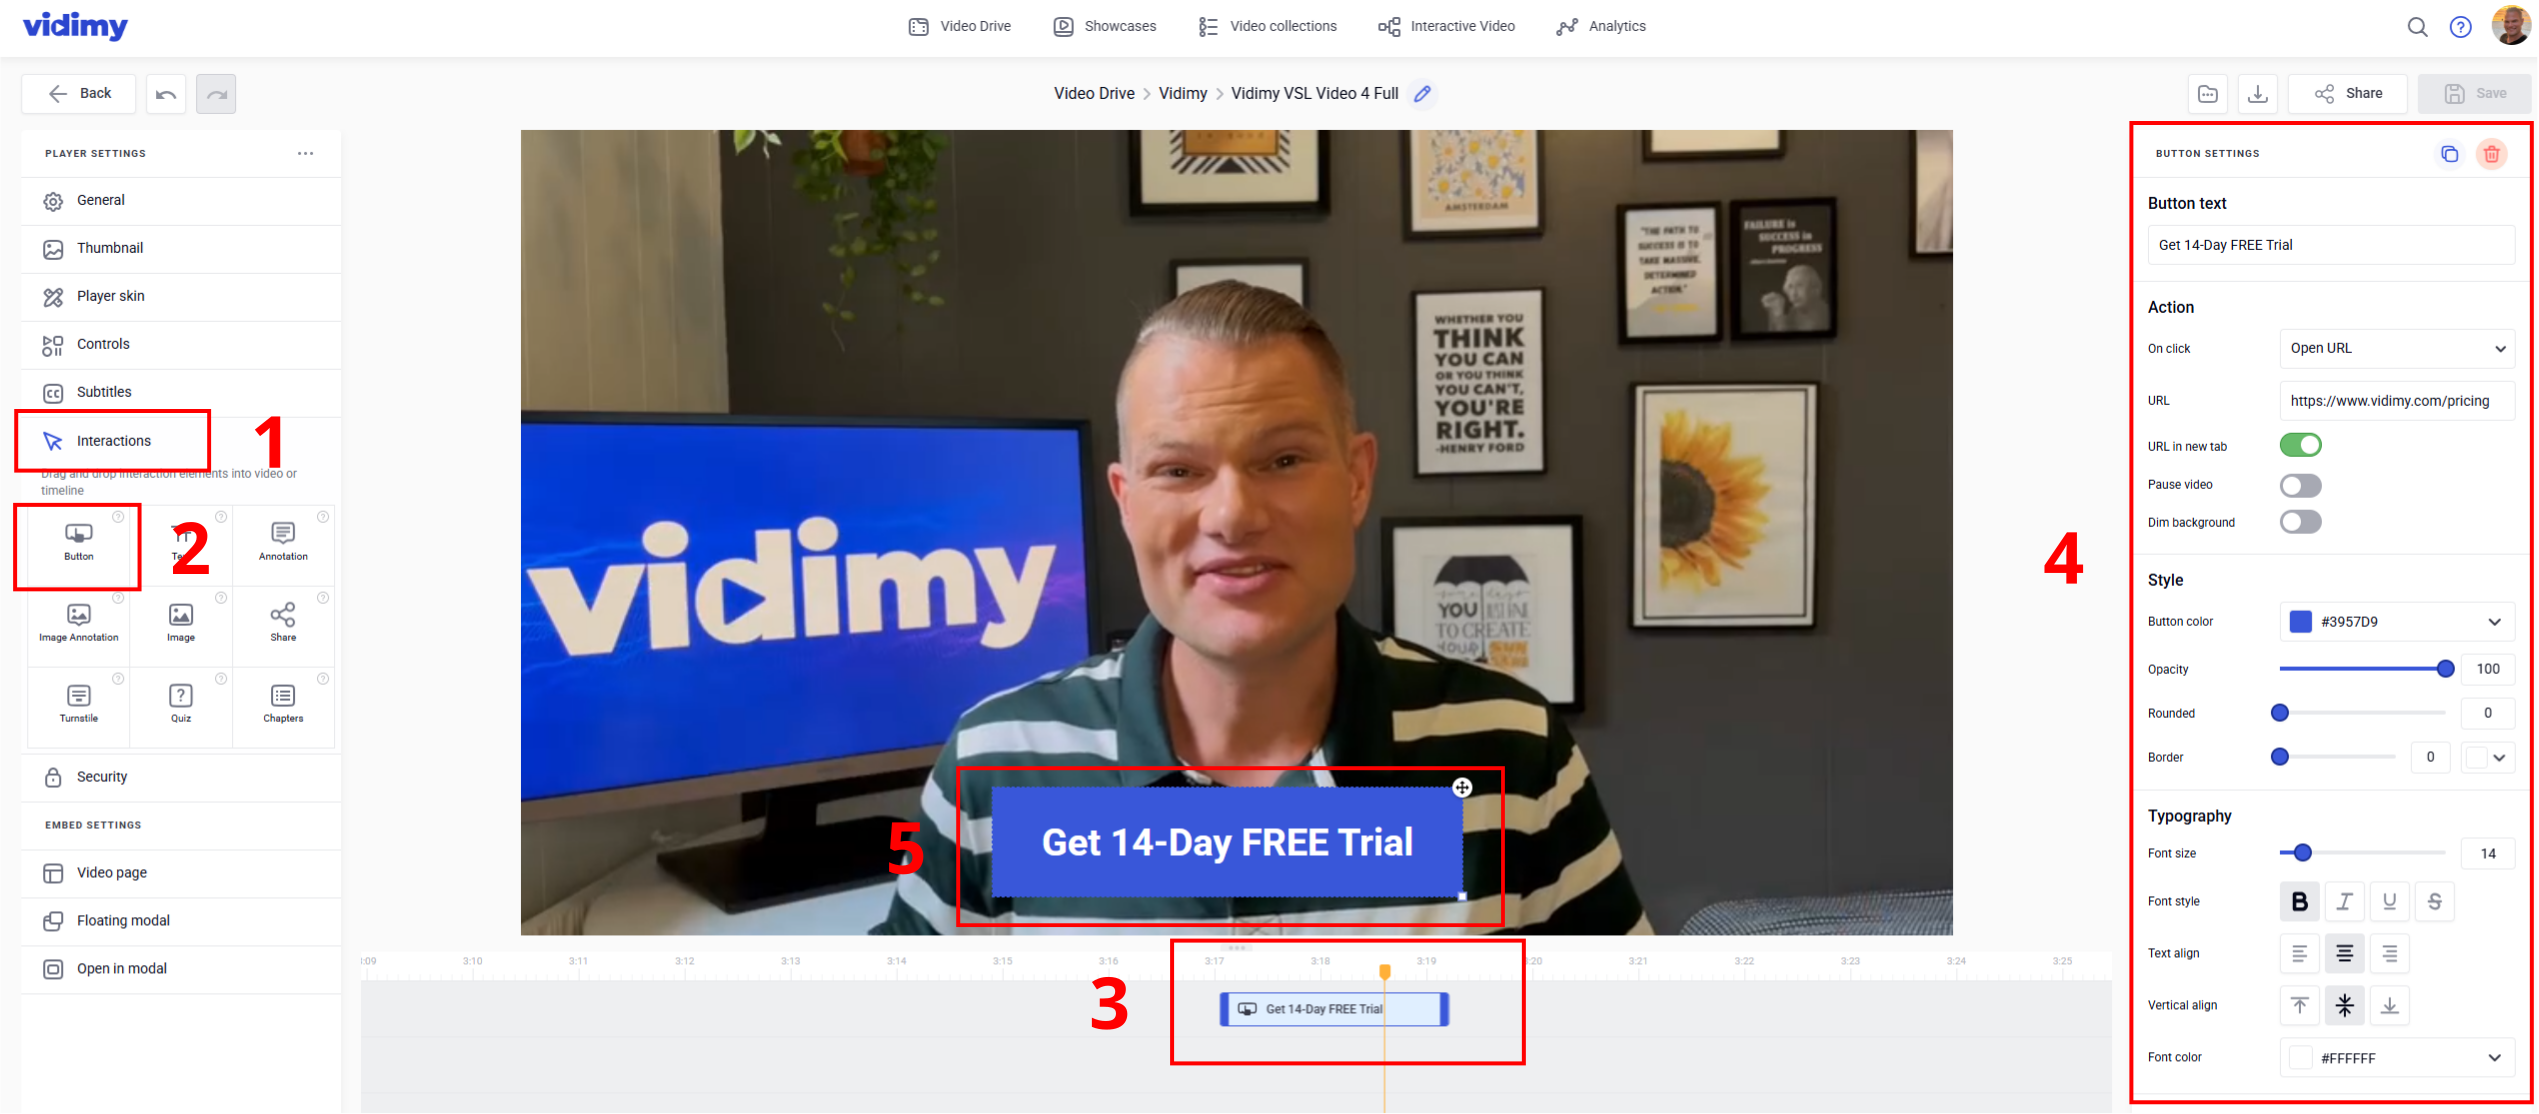
How To Setup Clickable Buttons In Videos
1. Go to "Interactions" inside the video with want to have buttons.
2. Drag and drop the "Button" module in left menu into the timeline below the video.
3. Click the button on the timeline and adjust the timing in the timeline.
4. Add your button text and customize the action and style to fit your brand.
5. Adjust the sizing (top right corner of the button) and placement of the button with simple drag and drop.
Pro tip: Place buttons when excitement is high (right after a big promise or demo).
Yes! You can duplicate a video funnel and make slight tweaks — like changing the call-to-action, button timing, or headline overlay. Then send half your traffic to Version A, half to Version B, and let the data decide the winner.
If you want to split test any video that's not a video funnel, simply upload the video again to have to versions you can test and see different analytics for each video. In case you don't have access to the video file, you can simply download it inside the Vidimy dashboard and upload it afterwards.
How To Setup A/B Split Test With Video Funnels
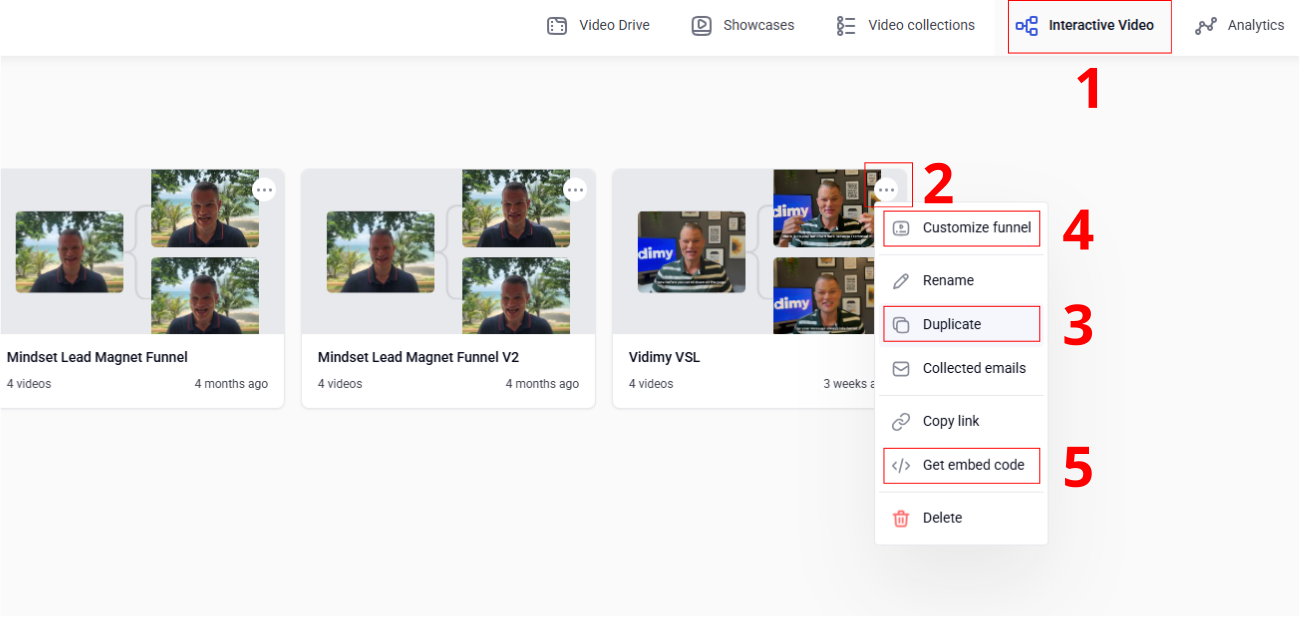
1. Go to "Interactive Video" in the top main menu in the Vidimy dashboard.
2. Click the "3 Dot Icon" to open the pop up menu.
3. Click "Duplicate" to make your B-version
4. Customize something inside the video such as CTA buttons, thumbnail, player style, etc.
5. Embed your new video code on your B-version of your website/funnel system with your A/B testing.
Chapters are great for longer content like trainings or demos.
You can set it up on any video that you want to have chapters.
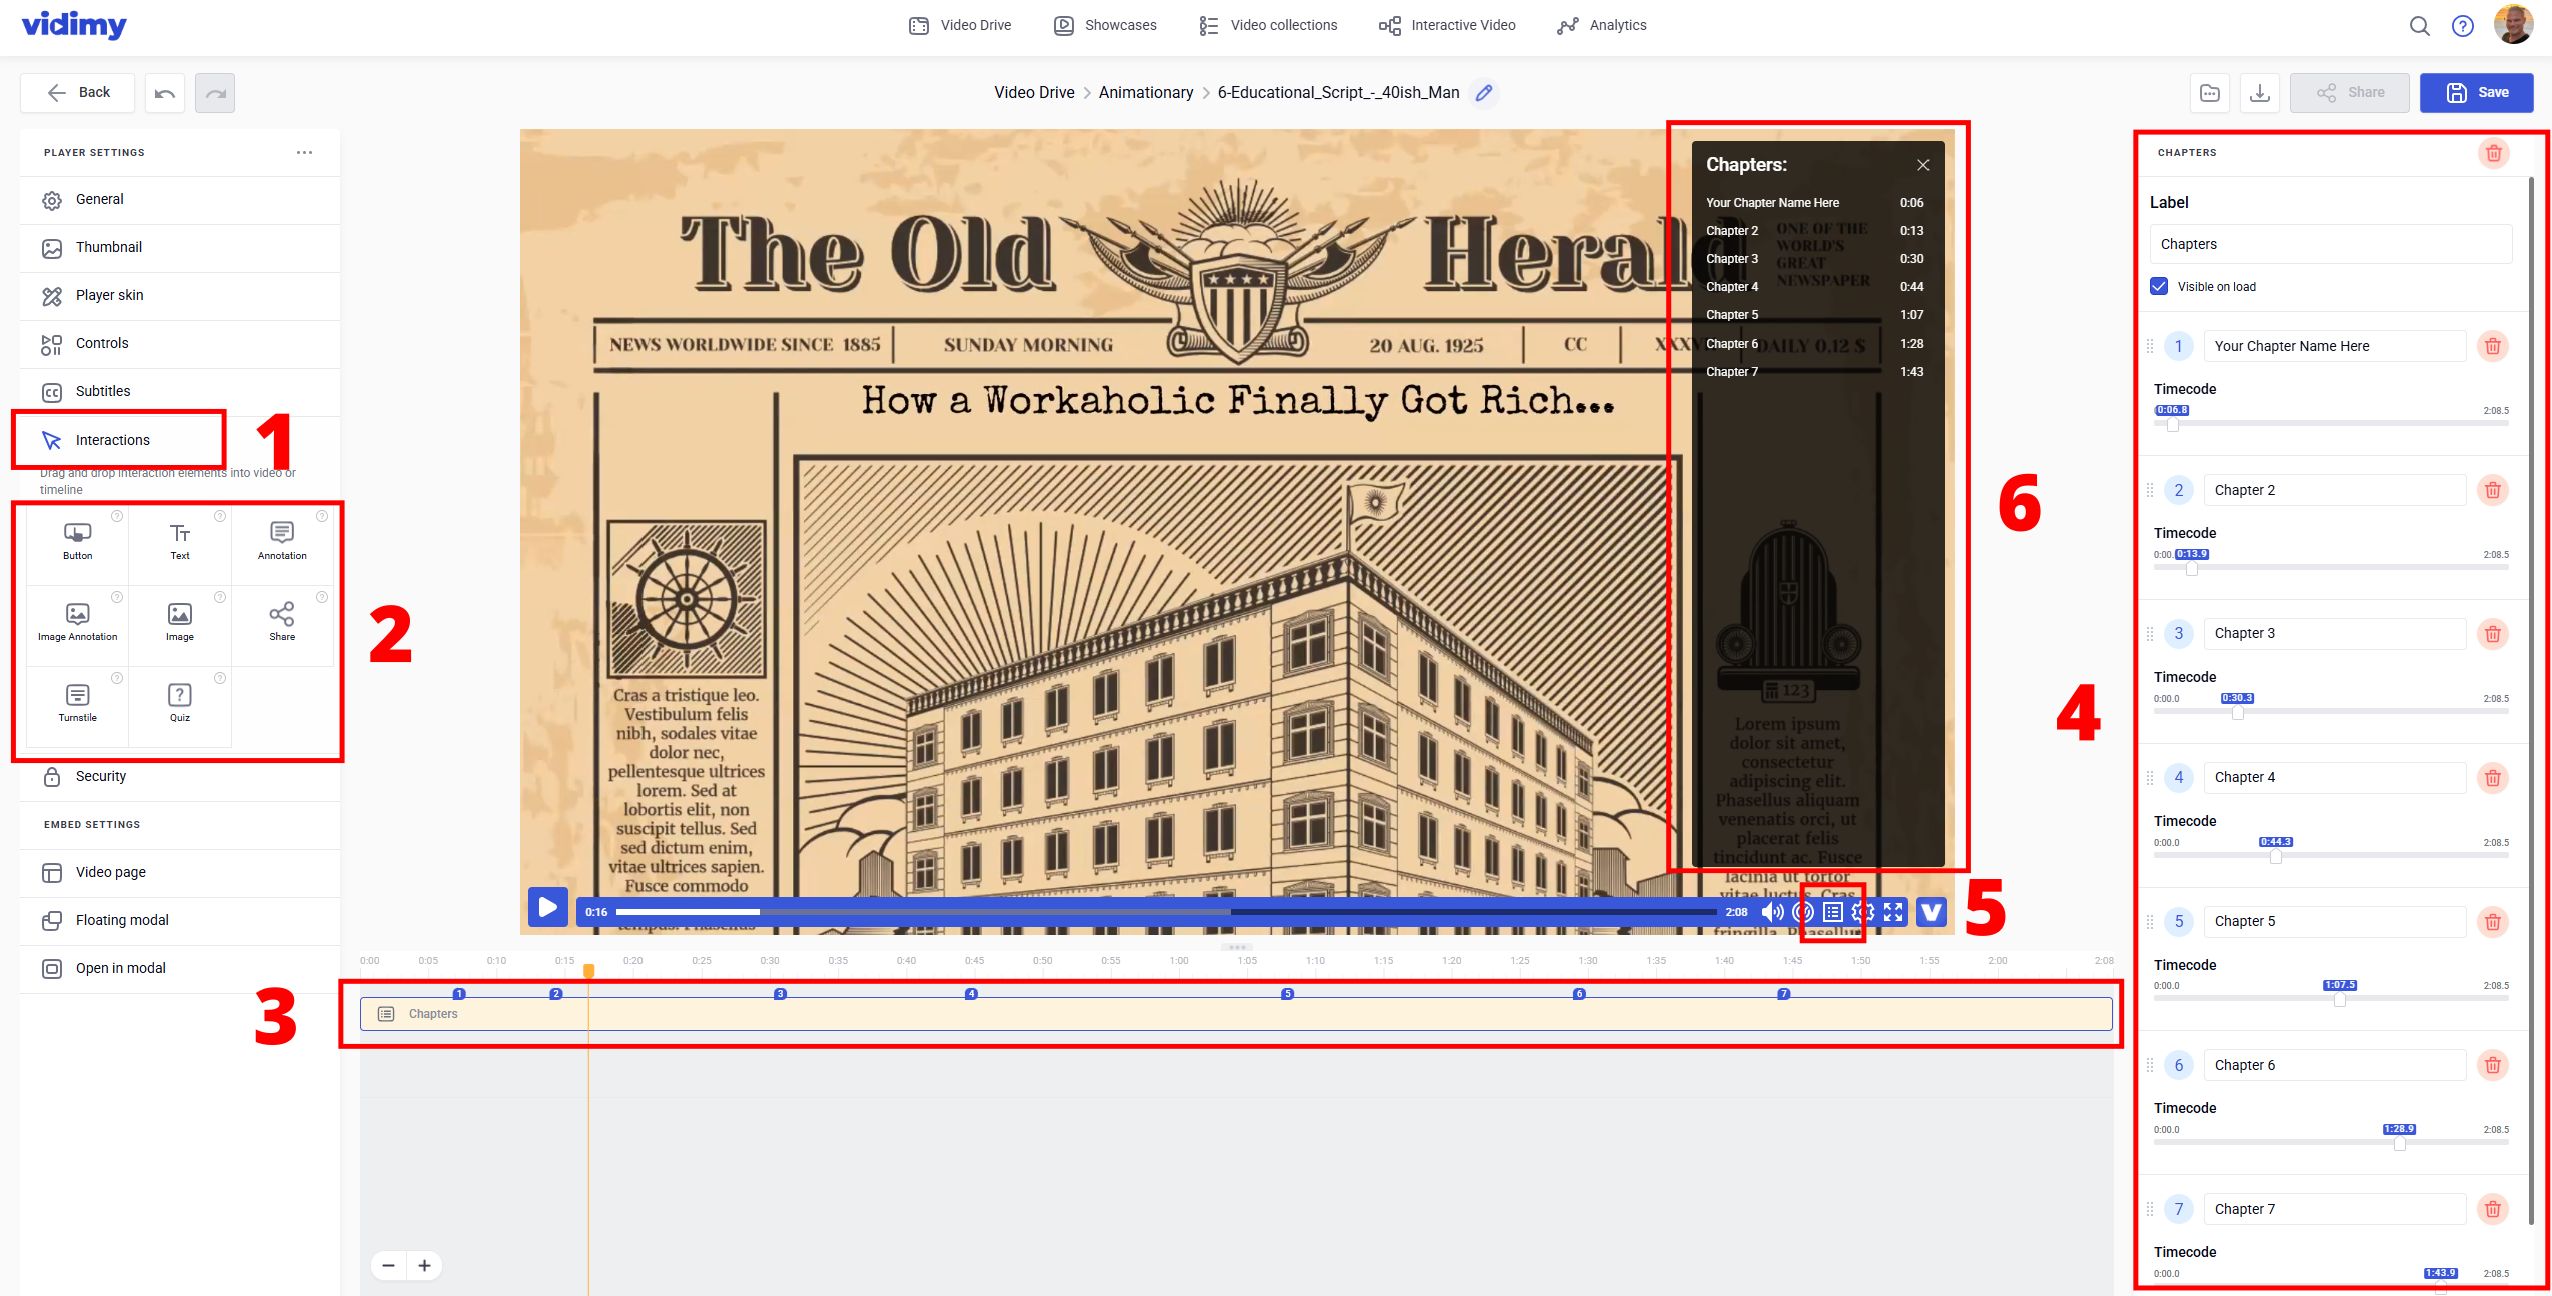
How To Setup Chapters
1. Go to "Interactions" inside the video you want to add chapters
2. Drag and drop the "Chapters” into the timeline. (not visible in image but will be in section #2 for you)
3. Click the "Chapters" field inside the timeline
4. Add chapters with the "+" button and edit their names to fit with your video
The last 2 steps simply shows how the chapters work.
5. Click this chapter icon to see how the chapters will look like inside your video
6. This is how the chapters are shown for viewers
Now viewers can jump to what matters most — without scrubbing aimlessly.
Branding is simple inside player settings:
- Upload your logo.
- Adjust colors to match your brand palette.
- Customize button shapes and fonts.
With just a few clicks, your video feels 100% yours — not generic hosting.
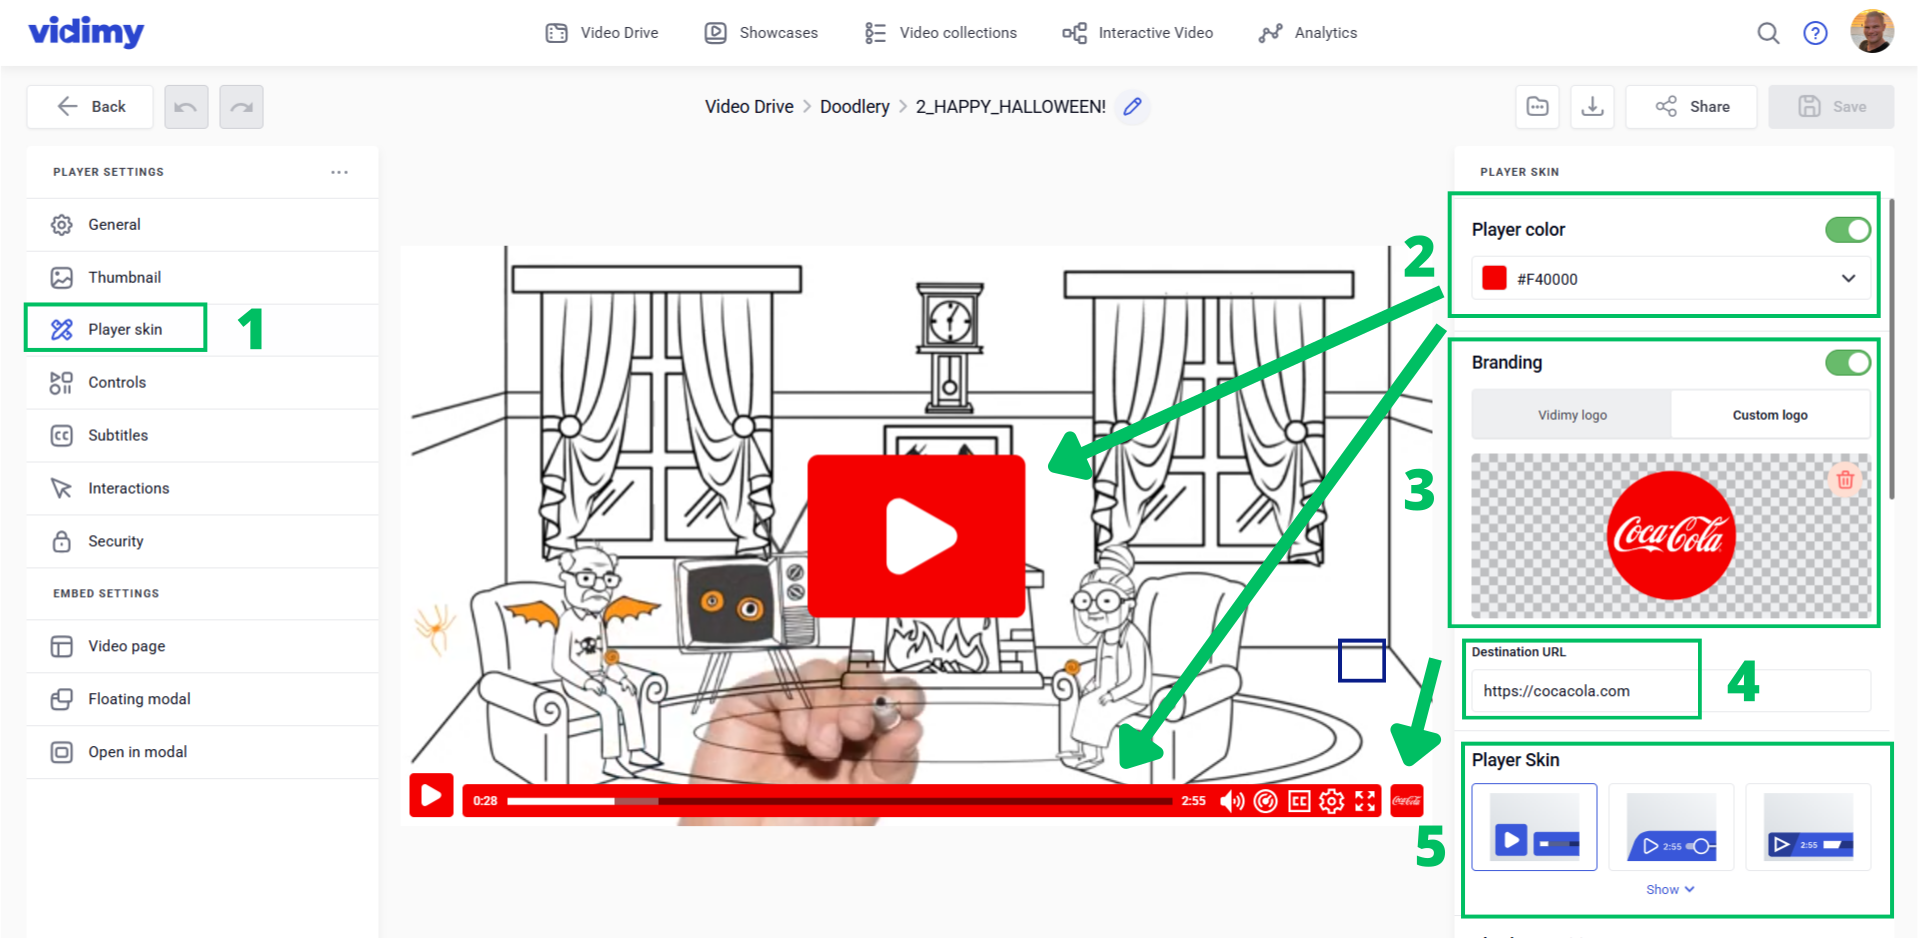
How To Brand Your Videos In Vidimy
1. Go to "Player skin" inside the video you want to brand.
2. Pick the color you want or insert your brands color code.
3. Click the logo to upload your logo (or deactivate branding to remove it).
4. Change the "Destination URL" to your website link.
5. Change "Player Skin" into the style you prefer.
Additional style settings are font on subtitles and interactions such as buttons and turnstile lead generation forms.
Upload your training videos and webinar replay videos, then add:
- Interactive notes → highlight key moments.
- Call-to-action buttons → like “Grab the replay workbook” or “Join the program.”
- Timed offers → buttons that appear right when you make the pitch.
- Timed opt-ins → turnstile overlay will appear where they can insert email to watch the rest. (can be skippable which comes in handy for lead magnet pop ups)
This keeps people engaged AND drives sign-ups even on replays.
You always have unlimited bandwidth, videos, clicks, leads, and from 1TB of cloud storage to host all your video training and webinar replays.
Yes! Vidimy integrates with 5 of the most popular email marketing platforms.
These include:
- Mail Chimp (free version)
- Get Response
- Zoho Mail (free version)
- Klaviyo
- Active Campaign
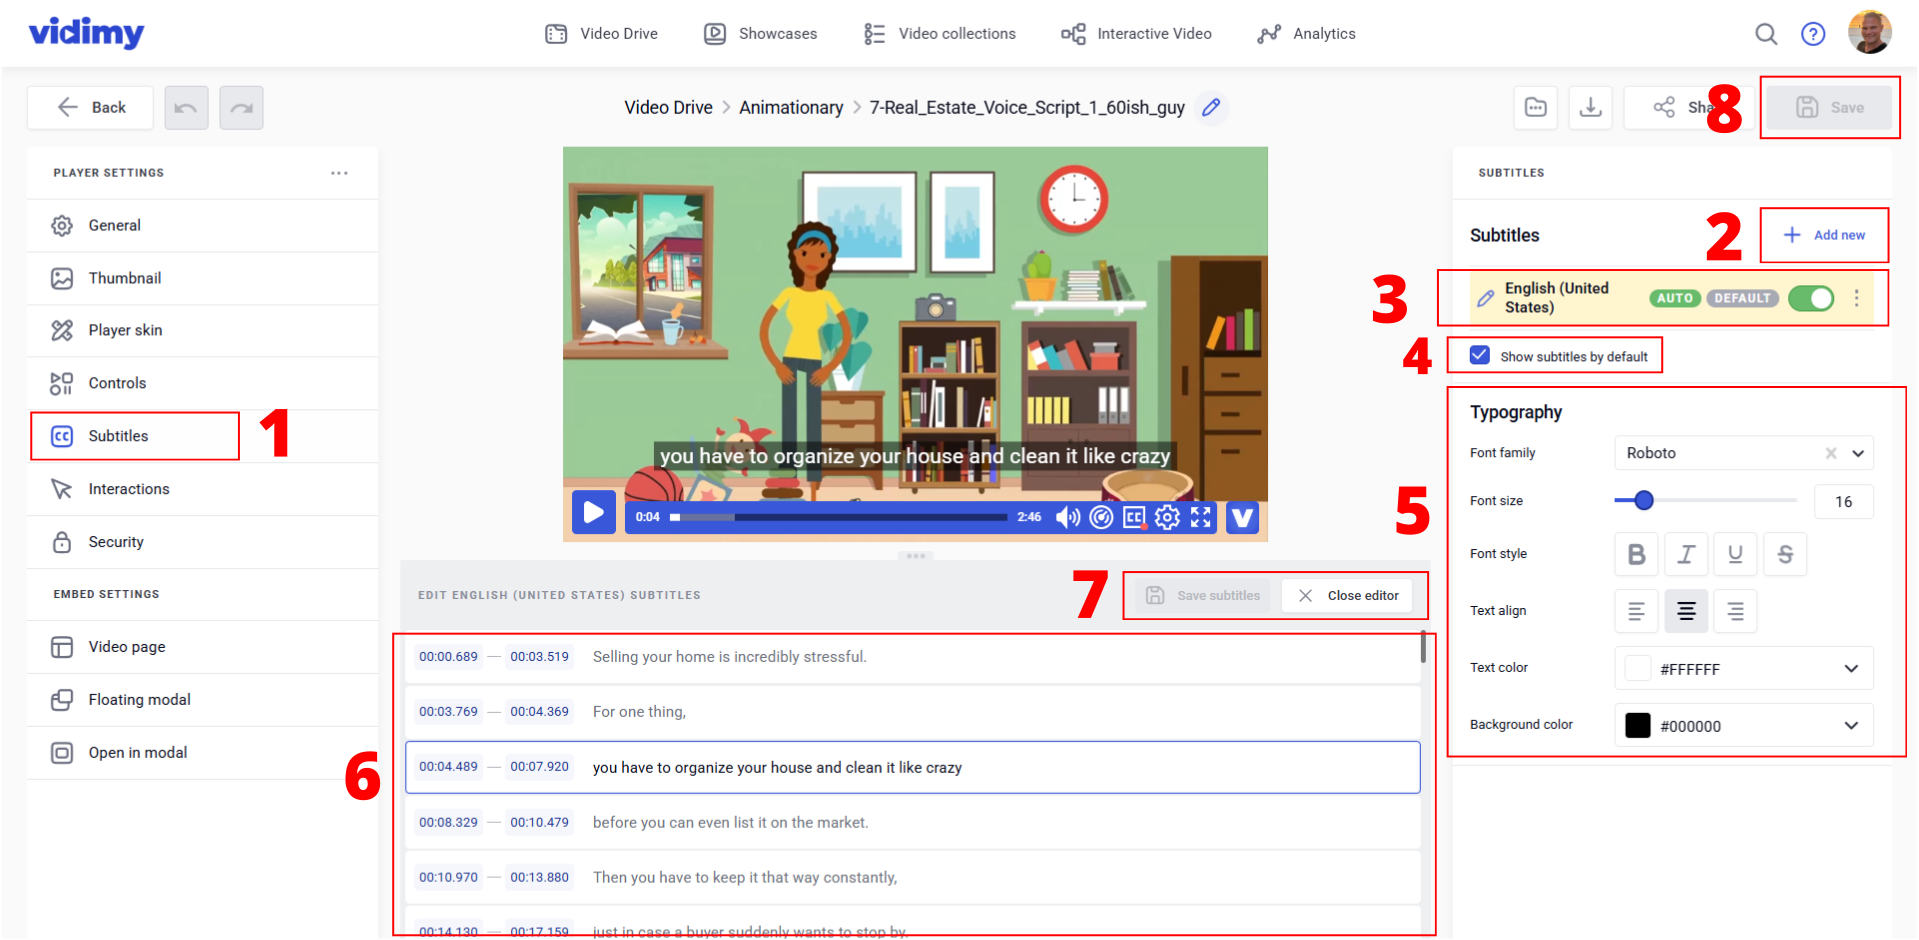
Accessibility boosts engagement. Upload your SRT file inside the editor, or let Vidimy auto-generate captions. You can style them to match your brand colors for a polished look.
How To Auto-Generate Subtitles In Any Language
1. Go to "Subtitles" inside the video.
2. Click "+ Add new" to add your new subtitles via file or auto-generate
3. Adjust the titles of your subtitles and click the "3 Dot Icon" to edit your subtitles
4. Check if you want your subtitles to be the default subtitles (important with more subtitle languages)
5. Customize the subtitles style to fit your brand style.
6. Edit the subtitles inside the editor to make it fit perfectly and correct any errors.
7. Remember to "Save subtitles" while you are editing to avoid losing your edits. Hit "Close editor" when you are finished editing the subtitles.
8. Save (DON'T FORGET THIS!)
Didn't Get Your Question Answeret?
Ask us any questions about Vidimy and how it can help you scale your business!
Ready to get started?
Create your account for FREE to skyrocket your video conversions without any tech or marketing skills needed.

Turning Your Views Into More Leads And Sales
Support | Terms of Service | Privacy Policy | Affiliate Program | Contact
Made with ❤️ in The United Kingdom
© 2025 Vidimy.com | All rights reserved.
This site is not a part of the Facebook website or Facebook INC. Additionally, this site is NOT endorsed by Facebook in ANY WAY. Facebook is a trademark of Facebook INC. You understand this to be an expression of opinions and not professional advice. You are solely responsible for the use of any content and hold Your Business and all members and affiliates harmless in any event or claim. You can also safely assume that I get paid anytime you click on a link on this site. We recommend that you do your own Independent research before purchasing anything.